Pressing flowers and Herbarium sheets: the perfect COVID-19 activity with kids
I never thought I’d be pressing and archiving flowers to create a Herbarium in my lifetime, let alone during a worldwide pandemic, but here we are. During our once-daily outings during lockdown in London, my four year old collects wild flowers.
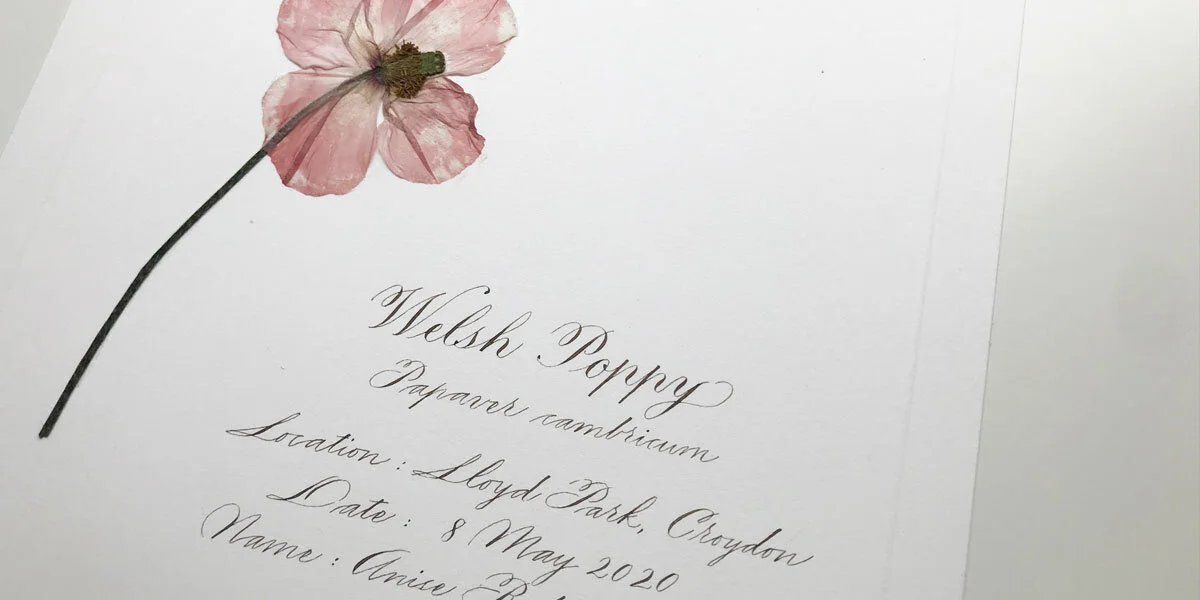
It came to mind that I might press her latest addition - a bright orange bloom that I have deemed a Welsh Poppy, but have no real authority to confirm or deny this (a friend suggested that it might be a California Poppy, but I’ll wantonly ignore that suggestion, having finished my sheet already). Also, having no real authority on how to press flowers, I found the Natural History Museum’s guide: How to Press Flowers, replete with a tutorial video (below) that, admittedly, I should have watched first.
In the NHM article, among the many things you can do with pressed flowers, was a suggestion to prepare your own Herbarium sheets to learn about plants in your local area or record plants growing in your garden. Defined by the Oxford Dictionary as a systematically arranged collection of dried plants, Herbariums, in the strictest scientific sense of the word, are essential collections of information about the world around us. In the less strict, less scientific sense, they are a wonderful activity to do with children, even if the only step of the process the kids are involved in is picking the flowers.
In addition the NHM’s fantastic resource, I was alerted to an extremely comprehensive webpage on Happy DIY Home about how to press flowers that I recommend you take a look at too. It goes into detail about which flowers can be pressed, how best to preserve their colour, the different techniques for drying and pressing, and suggestions for what you might use them for (in addition to Herbarium sheets).
Why should you create your own Herbarium?
Creating Herbarium sheets might just be the closest I ever come to being a scientist. It’s a wonderfully layman way to feel like you’re contributing to science (well, besides so many other ways, such as becoming a blood donor and organ donor). The Natural History Museum’s Botanist, Fred Rumsey, made it perfectly legitimate to become a scientist in your slippers: simply collect flowers, label them accordingly (particularly location and date), and, boom, you’ve created scientifically valuable data!
While feeling smart and studious might be your main motivation, my primary push was a way to connect me, my kids and nature with memories of these quiet, lazy lockdown days. Also, I can’t resist a new creative technique, especially as I have been growing ever more interested in botanical painting alongside calligraphy. How handy to have the real life specimen to hand, should I ever feel the need to paint a Welsh / Californian Poppy.
What do you need to create your Herbarium sheets?
Let’s get down to business. I’m going to tell you exactly what I used to create my Welsh Poppy herbarium sheets, but this is based on what I have to hand, and my calligraphy supplies. You don’t have to worry about fancy things, you can just pop them in a journal, or on a sheet of paper / card stock that you can collate as you go.
For the flower pressing
A flower (picked sensitively and with love from your local area)
A sheet of newspaper
Some hefty books (if you don’t have a flower press handy… I used the following, weighing in at a total of 6.6kg).
Books of Hours (1.3kg)
Usborne Illustrated Fairy Tales (1.1kg)
For the Herbarium sheet
For the calligraphy label
If you’re not a calligrapher, obviously you can make your label any way you like. Grab your favourite pen or print a template. This is what I used to write my details.
Cornellisen’s Walnut Ink (email them for their own brand)
Navigator 120gsm Ultra Smooth paper (for working out my layout)
What to include in your Herbarium label?
I found a fantastic Herbarium label summary from The University of Wisconsin - Green Bay’s Cofrin Center for Biodiversity, which states, at a minimum, the label should include:
the plant’s latin name
the location where it was collected
the collector’s name
Typically the label would also include a description of the habitat and associated species, an estimate of the plant's status at that site and a collector number. If the collector should misidentify the plant, the voucher can thereafter be examined by a knowledgeable botanist and the correct identity is then written on the voucher sheet in the process known as annotation.
Annotation, you say? It’s like they know me and my haphazardous scientific approach too well. Or perhaps mistaking a California Poppy for a Welsh one is not so uncommon.
For my own personal herbaria, I plan to also add a little note about what we were doing when we picked the flower. To you, boring, I know. To me, even. But perhaps a little diary entry of sorts will remind us of something one far off day in the future.
One bank holiday during lockdown, we all went to Lloyd Park. Jim walked, Mia cycled and Anise scooted while Kate jogged. At the park, Anise quickly spotted this beautiful orange flower.
Creating a Herbarium sheet: a step-by-step
The following outlines the process I took to create this exact piece. But you will find no end of inspiration for how you might make your own. A quick search for Herbariums on Pinterest brought up some beauties. I’d love to see what you come up with so please do share with me in the comments, via Instagram (tag @oliveandreid #lockdownherbarium), or email kate@oliveandreid.com.
Watch the video to see the steps below in under three minutes.
Step 1: Find a flower to press
As previously mentioned, I am no flower expert, but it’s spring and there are wild flowers to be found everywhere where I am. Go forth and forage!

Step 2: Press your flower
Using a large book, place a piece of newspaper between the pages, and lay your flower / plant as flat as possible. Close the book and weigh down. Check daily. The drying process can take days to weeks, depending on the moisture content of your flower. Follow the Natural History Museum’s guidance on that.
The specimen is ready once it no longer feels damp. The dried plant may be quite brittle, so be careful when moving it.
Step 3: Prepare your Herbarium sheet
While you’re waiting for your flower to dry, think about the design for your sheet. What size sheet, what information will you include, how will the flower you’re pressing look on the page with all of the information?
I decided I would use A4 sheets, which I could then put into clear sheets in an album. I wanted to calligraph directly onto the sheet with walnut ink in Copperplate and Spencerian scripts, so I chose a high quality watercolour paper (Bockingford Hot Pressed A4 Watercolour Paper).
Creating an embossed border
I wanted to try an embossing technique I hadn’t done before to create a raised border for mine. Choosing a 1.5cm border, which I penciled onto my card, I used my Crafter’s Companion Top Score Multiboard to score my card stock. I realised that the grooves in my board were set to 1.5cm, so in future I don’t need to measure, except to mark 1.5cm from the corners so I know where to stop and start (rather than cross over my lines to the ends of the paper).

Writing directly on your sheet
If you’re planning to write your details directly, I recommend working out your layout on another sheet the same size beforehand. Because I was inking, I used a printing paper that doesn’t bleed, Navigator 120gsm Ultra Smooth paper to work out the area I needed for my text. In my first draft, I had the plant name at the top of the page, which I decided to move to be with the text box on the bottom right of the page. Using my Aquino da Silva rulers, I chose the x-height for my scripts (4mm for the common name, 2mm for the latin name and details, 1.5mm for the story). Once written, I could see the length of the headings, allowing me to centre properly on the final piece.
If you’re printing a label, or writing it separately, you may like to add this after you’ve glued your flower to your Herbarium sheet.


Final step: Remove, position and glue your pressed flower into place
With your herbarium sheet embossed and labelled, and your flower finally dry, you’re ready to gently remove the flower from your press and affix it to your sheet. My flower was still quite attached the newspaper, so I very gently and slowly lifted it with a letter opener.


As I mentioned at the top, this is a great activity to do with the kids, so naturally you need to see that I didn’t just make this fancy herbarium sheet of the flower she picked. She also made her own!

I’d love to see yours, so don’t forget to share on Instagram (tagging @oliveandreid #lockdownherbarium).